![]() If you're anything like me your blog is probably full of code snippets and you're using WordPress Quicktags editor to enter your posts content. You're also using GeSHi compatible syntax highliter like WP-Syntax to make your code snippets more readable.
If you're anything like me your blog is probably full of code snippets and you're using WordPress Quicktags editor to enter your posts content. You're also using GeSHi compatible syntax highliter like WP-Syntax to make your code snippets more readable.
In this article I'll give you Javascript and PHP code I've created to add GeSHi compatible pre button to my blog's Quicktags editor toolbar on both frontend and backend.
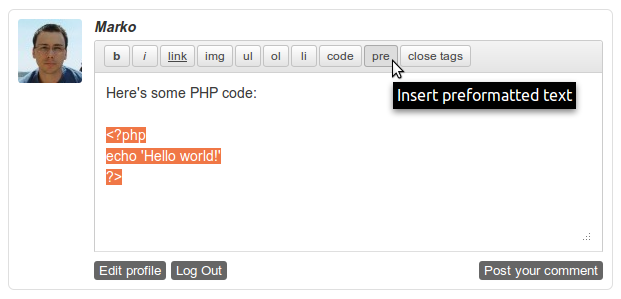
First some screenshots for you to understand what am I talking about. Here's me posting an imaginary comment containing code snippet in PHP language. I can just select the code and click pre button on my Quicktags editor to create GeSHi compatible pre block.
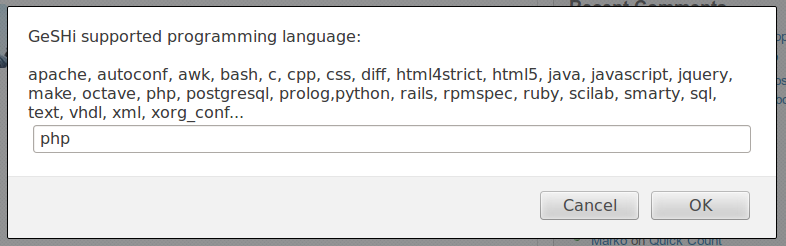
On the next screen I can select one of the GeSHi supported programming languages, I select PHP and click OK.
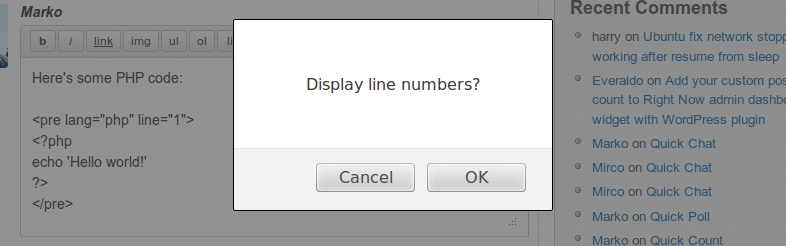
Here I select OK if I wan't line numbering and Cancel otherwise.
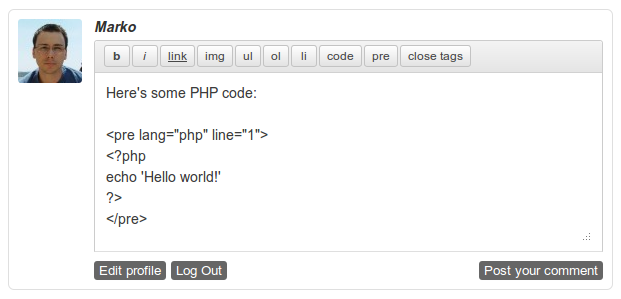
Here you can see finished pre block returned from pre button code.
And now the Javascript code that needs to be placed inside your_theme/js/qt-buttons.js file. It supports inserting both start and stop pre tags as well as wrapping code afterwords like I've done when creating screenshots. It also supports basic localizaton and translation. First the Javascript code:
1 2 3 4 5 6 7 8 9 10 11 12 13 14 15 16 17 18 19 20 21 22 23 24 25 26 27 28 29 30 31 32 33 34 35 36 37 38 39 40 41 42 43 44 45 46 47 48 49 50 51 52 53 54 55 56 57 58 59 60 61 62 63 64 65 66 67 68 69 70 71 72 73 74 75 76 77 78 79 80 81 82 83 84 85 | if(typeof(QTags) != 'undefined'){ QTags.addButton('pre', your_theme.i18n.pre_title, function(e, c, ed) { // Our tag var tag = 'pre', // Default GeSHi language def = your_theme.pre_def, // Prompt message for language select lang_mes = your_theme.i18n.pre_lang_mes +'\n\n'+your_theme.pre_langs, // Prompt message for line numbering line_mes = your_theme.i18n.pre_line_mes; var t = this; // Prompts for value and returns our pre tag start var start = function(){ var prmt, conf, line = ''; prmt = prompt(lang_mes, def); if(prmt == null) throw 'cancel'; if(prmt == '') prmt = def; conf = confirm(line_mes); if (conf == true){ line = ' line="1"'; } return '<'+tag+' lang="' + prmt + '"'+line+'>\n'; }, // Calls start() and opens our pre tag open = function(){ t.tagStart = start(); t.tagEnd = false; if (!ed.openTags) ed.openTags = []; ed.openTags.push(t.id); e.value = '/' + e.value; return true; }; try{ if (ed.canvas.selectionStart !== ed.canvas.selectionEnd) { // If we have text selection wrap it inside our pre tag t.tagStart = start(); t.tagEnd = '\n<'+'/'+tag+'>'; } else if (ed.openTags) { // If editor has any open tags // Test is open tag is our pre tag var ret = false, i = 0; while ( i < ed.openTags.length ) { ret = ed.openTags[i] == t.id ? i : false; i++; } if (ret === false) { // If open tag is not our pre tag then open open our pre tag open(); } else { // If open tag is our pre tag then close it ed.openTags.splice(ret, 1); t.tagStart = '\n</'+tag+'>'; e.value = t.display; } } else { // No selection, no open tags then open the tag open(); } }catch(error){ if(error === 'cancel') return; } // When we've defined tagStart, tagEnd and openTags we add our pre button QTags.TagButton.prototype.callback.call(t, e, c, ed); }, null, null, your_theme.i18n.pre_tooltip, 120); } |
I wont get into the code, if you're interested please take a look at code comments. Now for the PHP code. PHP code is here to enqueue our Javascript whenever we have Quicktags editor present and it's supposed to be placed inside your functions.php file. I run Quicktags on both frontend (wp_enqueue_scripts) and backend (admin_enqueue_scripts) but you'll most probably need the Javascript on the backend only. Here's the PHP code.
1 2 3 4 5 6 7 8 9 10 11 12 13 14 15 16 17 18 19 20 21 22 23 24 25 26 27 28 29 30 31 32 33 34 35 36 37 38 39 40 41 42 43 44 45 46 47 48 49 50 51 52 53 54 55 56 57 58 59 60 61 62 63 64 65 66 67 68 69 70 71 72 73 74 75 76 77 78 | <?php /** * Calls your_theme_qt_buttons_scripts() for Quicktags on comments form UI */ function your_theme_scripts(){ // Is there Quicktags editor here? if(is_singular()){ your_theme_qt_buttons_scripts(); } } add_action('wp_enqueue_scripts', 'your_theme_scripts'); /** * Calls your_theme_qt_buttons_scripts() for Quicktags on new post, * edit post and backend comments UI */ function your_theme_admin_scripts($hook){ $script_suffix = (defined('SCRIPT_DEBUG') && SCRIPT_DEBUG) ? '.dev' : ''; // Is there Quicktags editor here? if ($hook == 'post-new.php' || $hook == 'post.php' || $hook == 'comment.php' || $hook == 'edit-comments.php'){ your_theme_qt_buttons_scripts($script_suffix); } } add_action('admin_enqueue_scripts', 'your_theme_admin_scripts'); /** * Enqueues Quicktags buttons Javascript code and its localization variables. */ function your_theme_qt_buttons_scripts(){ // Is GeSHI present on the system? if (class_exists('GeSHi')) { // Enqueue script wp_enqueue_script( 'your_theme-qt-buttons', get_bloginfo('template_url').'/js/qt-buttons.js', array('quicktags'), false, true ); // Localize script wp_localize_script( 'your_theme-qt-buttons', 'your_theme', array( 'pre_langs' => 'apache, autoconf, awk, bash, c, cpp, css, diff, '. 'html4strict, html5, java, javascript, jquery, '. 'make, octave, php, postgresql, prolog, python, '. 'rails, rpmspec, ruby, scilab, smarty, sql, text, '. 'vhdl, xml, xorg_conf...', 'pre_def' => 'text', 'i18n' => array( 'pre_lang_mes' => __( 'GeSHi supported programming language:', 'your_theme' ), 'pre_line_mes' => __( 'Display line numbers?', 'your_theme' ), 'pre_tooltip' => __( 'Insert preformatted text', 'your_theme' ), 'pre_title' => __( 'pre', 'your_theme' ) ) ) ); } } ?> |
That's it, you can test Quicktags Javascript button code right here at my comment form. Enjoy!