Having GSM Internet connection and multiple Debian based PC in your local network is not every users dream situation. That's especially true if your mobile broadband service provider limits amount of data you can transfer per month for reasonable price, and everything above limit is very expensive. Besides that having flat rate Internet connection and hundred PC inside your LAN could potentially create unnecessary network congestions. Wouldn't it be nice to have some kind of apt caching proxy so we could download apt packages and updates only one time, and then distribute them inside our LAN to all of our Ubuntu or Debian PCs? Author of Apt-Cacher NG apt caching proxy came to rescue with its useful but somewhat hard to setup application. I will explain how to get things moving in 10 minutes max...
First things first, we must install Apt-Cacher NG. In Ubuntu we can do it GUI way or by entering these commands in our terminal:
sudo apt-get install apt-cacher-ng |
Like every decent Linux application, Apt-Cacher NG comes with its own configuration /monitoring Web UI. Its default port as well as apt cache proxy port is 3142. If that doesn't suite your needs you can go to /etc/apt-cacher-ng/acng.conf configuration file and change port amongst other things. Knowing that, if you want to monitor your Apt-Cacher NG server, you can go to http://127.0.0.1:3142 and click on "Statistics report and configuration page".
If you want your Ubuntu PC to use Apt-Cacher NG instead of direct connection to your apt servers you must adjust apt settings. Also if you use Synaptic package manager you must do the same for its options too.
First we will adjust apt on every client PC so that caching server is used when entering commands like "apt-get install xxx" on our terminal. Type the following to your terminal and press enter:
sudo gedit /etc/apt/apt.conf.d/02proxy |
Now add this line to the end of this file (modify 127.0.0.1:3142 by replacing it with your Apt-Cacher-NG servers IP address and port form your acng.conf file).
Acquire::http { Proxy "127.0.0.1:3142"; }; |
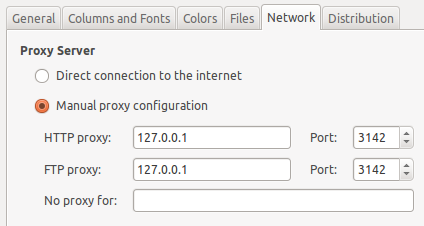
Next we adjust Synaptic package manager to use our caching server. Inside Synaptic GUI go to Settings->Preferences -> Network Tab and adjust according to your servers IP adress and port:
Now restart PC for new apt settings to take any effect. Also when your PC reboots you must run:
sudo apt-get update |
Next, you modify every PC in your local network using this same procedure. And one more thing. If you already have ton of packages you would like to "import" to Apt-Cacher NG server you should copy all of them to servers "/var/cache/apt-cacher-ng/_import" directory. This is example of copying already downloaded packages from servers standard apt cache:
sudo mkdir /var/cache/apt-cacher-ng/_import sudo cp /var/cache/apt/archives/* /var/cache/apt-cacher-ng/_import/ sudo chown -R apt-cacher-ng /var/cache/apt-cacher-ng/_import |
Now go to the Apt-Cacher Web UI at 127.0.0.1:3142 (or what ever address and port you have assigned for your server), click on "Statistics report and configuration page" and then on "Start import" button on the bottom of that page. It will take some time to import all of the packages. I suggest turning off standard apt cache on your Apt-Cacher NG server (Synaptic : Settings-> Preferences -> Files -> Delete downloaded packages after installation) because there is no use in having two apt caches besides wasting valuable HDD space.
That's it. You have fully working Apt-Cacher NG cache proxy server.
Thanks a lot